Pages

Sunday, December 22, 2013

Scrumptious Saturdays #3 - Honey Biscuits

There is one treat which always comes to mind when I think of Christmas baking. That's right, homey biscuits! 


The recipe that I use has been passed from generation to generation within my family. This is how it goes:

Ingredients:
1 cup honey
1 cup sugar
1 tbsp butter
1/2 cup cold water
1 1/2 tsp bicarb soda
1 egg beaten
1 tsp ground cloves and cinnamon
2 cups SR flour
2 cups plain flour

Preheat oven to 180°.In a small saucepan heat honey, sugar and butter gently until dissolved. Add water and bicarbonate soda (don't worry, it's meant to go bubbly). Stir. Let stand until lukewarm. Add beaten egg, cloves, cinnamon, and flour. Mix until a soft and manageable dough forms. Leave in bowl for several hours is possible, and keep in the fridge until you are ready to cut out the shapes. I always find that cold dough is better for cutting. 

Now, lightly flour a bench top or work surface and a rolling pin. Roll out the dough to around 1/2-1cm thick. Cut out in shapes of your choice, and bake in oven for 7 minutes. 

Icing:

Ingredients:
2 egg whites 
Pure icing sugar
Squeeze of lemon juice

Seperate your egg white into a bowl and add a squeeze if lemon juice. (It has to be lemon, so that the icing will set). Stir in icing sugar, adding more until the icing is nice and thick. We decided to Seperate it into two bowls and add green food colouring to one, and pink to the other. Now, fill up so e icing bags and let your creativity run wild! 


I hope you enjoyed this recipe, and I have to say, these are the best honey biscuits I have ever tried! (I might be a little biased!)

Au Revoir xx

Friday, December 20, 2013

Christmas DIY - Christmas Cards

I'm not sure about you, but I always find that I spend way too much money on Christmas cards! So this year, I told myself that I would make all of the cards myself! I went out to Typo, and bought a couple of things like stamps, tape, and stickers. These are my favourites that I've made so far:


I played around using the tape I bought as a border, and I love the effect it gave. I also really like the 3D bauble that I made from sticking several circles together that had been coloured in. 


I also did some cards facing down. As you can see there are endless possibilities when you make your own cards, and I, for one, find much better making your own cards that you love rather than using expensive store-bought ones that aren't nearly as pretty! I've already given most of mine out to my friends, but I did use a gingerbread man shaped stamp with a silver stamp pad, and a stamp that says Merry Christmas! on it. 

Making your own Christmas cards is such a fun way to personalize a present or just save some money. I feel that when I receive a handmade card it feels more from the heart and it feels good knowing that someone spent time to make a card for you. Have you made your own cards this year?

Au Revoir xx


Sunday, December 15, 2013

Christmas DIY - Deer Pillow Case

Hello! Today for Christmas DIY I will show you how to make this beautiful deer pillow case!


Obviously mine has many imperfections, all of which are very easy to fix. For example there are some random splodges of gold outside of the deer shape, but I will tell you how to avoid these soon.

First of all, we have to collect our materials.

You will need:

  • A pillowcase (I used a very old one, hence some of the marks)
  • Gold spray paint
  • A deer stencil
  • Double sided tape
  • Scissors
  • Sticky Tape

1. To start, you will need to print a deer stencil from the computer or draw one on a piece of A4 paper. This is the stencil I used:


2. Then you have to cut it out. Remember that it is the outside we want, not the inside, so you can cut through the head. There are also two background sections in the antlers, so make sure to keep them. 

3. Now cover the edges of the deer-shaped-hole with double sided tape. It is alright to have a few gaps but the tape will make a much neater edge. Also stick the antler cut-outs onto some tape too. 

4. Stick your template and cut-outs on the centre of the pillowcase. Make sure it is all flat. You should now have a piece of paper with a deer-shaped hole stuck onto your pillowcase. 

5. Using normal tape, stick more sheets of paper arounf the template. This is to avoid getting spray paint on the rest of the pillowcase, which is where I went wrong.

6. Now we can paint! Hold the spray can about 20cm away from the pillowcase and spray until the stencil is covered.

7. Remove the stencil and paper, and leave to dry. Now you have a deer shape on a pillow!


The more you do this project, the better it will turn out! This is such an easy way to decorate for christmas, or you could use different designs for different times of the year. The spray paint doesn't rub off when you lean on it, and it is so easy and quick. I made this in less than 1 hour!

I'd love to hear what you thought of this, why don't you have a go?

Au Revoir xx


Saturday, December 14, 2013

The Christmas Tag!

What time of year do you start your Christmas shopping?
I usually start shopping at late November to early December. I always run out of time though, because I like making presents for my family and friends too, and they take a lot longer.

Do you have any Christmas traditions?
Of course I do!! Who doesn't?

• Putting up the Christmas tree on the first of December! Unfortunately we couldn't do that one this year as we are having renovations!

• Having Christmas lunch at one of our family groups houses. This year we are going to my mums sisters husbands parents house! 

• Opening our presents in the living room early on Christmas morning.

• We go to church every Christmas Eve, and we sometimes have a catch up with friends afterwards, as a lot of our friends go to the same church as us. 

• My Grandad come over from England late every November to celebrate with us!

Do you have any festive recipes for food or drink that you limit solely to the Christmas season to share?

I always make honey biscuits at this time of year, and I never make them at any other time.  I also always make a gingerbread house decorated with smarties and icing! Yum!

Do you have a favourite Christmas song?

I love so many, I don't think I can pick a favourite! Some of them would have to be 'All I want for Christmas is you', 'Mistletoe', and pretty much every song Justin Bieber's Under the Mistletoe album!

What about a favourite Christmas movie?

It has to be Elf. There is nothing to fault at all about that movie. 

What is your Christmas wrapping strategy?

This year it is silver and brown chevron paper, green ribbon, and making everything matching. 

Describe your tree. How tall? Real or artificial? How is it decorated?

It's a fake green tree, almost 2 metres tall, and this year it is decorated in pale green and silver. 

Do you decorate just the tree or other areas of the house too?

I decorate my bedroom, and the tree, and the front of the house.

What do wear on Christmas day?

Whatever I feel like, usually a pretty top and skirt or a dress. 

What is your dream gift this year?

Pandora charms, and a new wardrobe!

Hope you enjoyed, leave a comment saying what you do at Christmas time! 

Au Revoir xx


Wednesday, December 11, 2013

Summer Holiday Goals

Hello everyone! As you all probably know, it is now the summer holidays!!! Yay! But this means that I have some more goal making to do, as I think setting goals is a great and beneficial way to move you towards your ideal lifestyle. So I've listed a few things below which I want to achieve.


1. I really want to get up before 10 every morning and have a healthy breakfast straight away. This means I can enjoy the full day and have a healthy start.
2. Have a glass of water with every meal I have this holidays. This may seem a bit silly but it's a great way to ensure your drinking enough water. Having enough water helps improve your hair, skin, nails, and brain function. This is a part of a new fitness regime tha I am excited about and I will be making a post about soon.
3. Do some exercise each day. Whether is be swimming, walking, running, or sport, it's important to exercise and I defiantly don't do enough in the lazy days of the holidays. 
4. Keep my room tidy. I'm just one of those people who think "oh, I'll put it away later"! This means my room is always a constant mess, and I hate it! I'm going to try hard to keep it spotless! 
5. Be social! Not in the social networking way, but the actual face-to-face seeing each other way!! I've really got to get out more! 
6. Use and write in my diary. I got a beautiful diary for my birthday from one of bestest friends ever, and I want to use it consistently and get into the pattern of using it for next year. Don't you just love the idea of a cute little recording of your daily activities and memories? I do, hehe :)

Those are some things I would like to achieve and keep up during the summer hols, and I think they could be very good and beneficial if I keep them up, which I will try very hard to do! What are your goals these holidays? Hope you enjoyed :)!

Au Revoir xx

Tuesday, December 10, 2013

Christmas DIY - Glitter Candle Holder


Hello! 
This is another mini-series post from Chistmas DIY, and I'm going to show you how to make this cute little glitter tea light holder out of a jar.

                               
                             It's not a very good photo because my tea light broke!! :(


You will need:
• Old jar
• Gold glitter
• Craft glue
• Wide sticky tape/clear contact
• Paintbrush
• Fake tea light
• Scissors

1. Clean off any old labels and stickers from your jar.
2. Cut a shape with the scissors out of the tape/contact. I did a Christmas tree shape but you could a heart, star or anything you want. It's aap bit fiddley but if you take some time it should turn out all right.
3. Stick the shape onto the inside of the jar. Make sure that it's stuck down well.
4. Use the paintbrush to paint the glue all around the inside of the jar. Try not to miss any patches.
5. Pour in some of the gold glitter and place the lid back on the jar. If you don't have a lid than covering the opening with your hand should work. Now you've got to shake, shake, shake!!
6. Pour out all of the excess glitter. I tipped mine through a paper funnel back into the pot it came in.
7. Wait for the glue to dry. Now you've got to remove the sticker! I recommend using contact for your shape, as I used sticky tape and it was hard to remove. I had to use a mix between my craft knife and my fingers to get it off. 
8. Now we can pop in a fake candle and watch a Christmas tree appear! 

This is so cute, and although mines nowhere near perfect it still looks adorable! You could use multiple stickers for more than one gap, different colours of glitter, or different sized jars to make lots of these cute lanterns/candle holders!! I know that I'll be making lots more!

Au Revoir xx


Sunday, December 08, 2013

Scrumptious Saturdays #2 - Berry Torte


I know, I know, it's Sunday. I may have forgotten to post this yesterday, oops! But mmmm, who wouldn't want a chocolate cake with chocolate icing and berries and cream? I want to make these babies so bad, and they would be the perfect treat for a Christmas party. I found the recipe in a cookbook which is called Mini Desserts by Sara Lewis.


Ingredients: 
CAKE
85g cocoa
250ml boiling water
115g softened butter
250g Muscovado sugar (Barbados sugar)
2 eggs beaten
200g plain flour
1 tsp baking powder
FILLING
150ml double cream
115g strawberries, finely chopped
1 tsp finely chopped fresh mint
1 tsp castor sugar
ICING
150ml double cream
150g plain chocolate, roughly chopped

Method:

1. Preheat oven to 180°C. Line a square cake tin.
2. Stir boiling water gradually into the cocoa, until it forms a smooth paste. Set aside to cool.
3. Beat together the muscovado sugar and butter until light and fluffy. Gradually beat in the eggs, and a tablespoon of flour until smooth. Sift in remaining flour and baking powder, and the. Gradually fold in cocoa and water mixture.
4. Bake in preheated oven for 25-30m. Transfer to wire rack after cooling for 10 minutes.
5. Using a heart shaped cutter, cut out 20 hearts. Cut each of them in half, creating 40 hearts. 
6. For the filling, beat cream until it forms soft peaks. Fold in strawberries, mint, and sugar. 
7. Ice a bottom heart with the filling and put the top half of it on top, like a sandwich. Put the cakes onto a wire rack.
8. To make the icing, bring the cream to a boil and remove from heat. Stir in the chocolate chunks and continue stirring for 5 minutes or until all the chocolate is melted and combined. Allow to cool and thicken for 15 minutes and the ice each heart cake. 

These cakes sound so yummy and sweet, I really want to try one!

Au Revoir xx

Saturday, December 07, 2013

Christmas Room Decorations


Christmas: The time for joy and festivities, for excitement and for beautiful decorations! This year I've gone all out while decorating my room for Christmas, and it is all very cheap! There are several things I did to decorate my bedroom and I will show you now! :D! (I'm very sorry for the shocking quality photos, I promise they will get better really soon!)


Tinsel! Tinsel is such a cheap way to add sparkle and Christmas spirit to an area or wall. I hung a few meters of silver tinsel in a scallop pattern above my window with blu-tack. Good ol' blu-tack! I got 10 meters tinsel for $5 from Big W, and definitely didn't use it all. 


Candles. I love them! They are so warm and bright and festive, and are the perfect gift for friends. I use them in clusters like shown above, or dot them around my room. The ones above I have gotten for presents, and I will show you guys how to make the middle one in an upcoming Christmas DIY post! 


Christmas Trees! I like arranging a couple of little trees in my room because they are really adorable and pretty. I made the green one when I was in year one out of a magazine, and I don't know where the white one came from but it looks so good! Christmas trees are a really festive and classic way to bring about the excitement of Christmas!


Fairy lights! For me, this is the best step. Fairy lights basically represent Christmas, and they are so festive and cute and sparkly. I'm not a big fan of colourful ones, but I think the plain ones are so beautiful. The star fairy lights are from Big W for $5, and I think the long ones are too, but they are more expensive. This is the perfect finishing touch, and really complete the decorations for me. 


I made this card holding string with little pegs, and red string. You can't see it in this photo, but on the pegs are little silver glittery stars which are so cute! This is just a fun way to organize and display your Christmas cards.


I like to set up little Christmassy displays on my bedside table and shelf because, well, why not? I like decorating my room, so I do it. I just picked some white roses from the garden and put them into an iced tea bottle, added a red candle and already it looks so much nicer, all set for Christmas!


After I'd chucked a red pillow and throw on my bed, I was happy and surprised at how well my room turned out. I also made the gold deer pillow but I will do another DIY post on that. 

Decorating for Christmas is really enjoyable, cheap, and fulfilling, and best of all: it looks amazing! What have done to decorate your bedroom this year?

Au Revoir xx


Christmas DIY - Tree Advent Calendar


This is a bit late for the start of December, I know, but better late than never right?
To make this beautiful DIY tree-shaped Advent Calendar, you will need:

• a piece of red card, or a colour of your choice.
• colored paper (I used blue, pink and orange)
• a pen
• washi tape (colourful tape)
• scissors
• ruler

1. On you card, use the ruler to find the middle of the short end. Draw a straight line to the top of the card, marking where the top point will be.

2. Draw the outline of your tree by marking out the trunk and drawing diagonal lines from the top point to bottom corners of the tree.

3. Cut out the tree.

4. Use your washi tape to make a pattern on your tree. I used stripy tape and did a simple diagonal pattern.

5. Use a circle, such as the end go a glue stick or a candle, to mark out lots of circles on your coloured paper. You will need 24. Cut them all out.

6. Lay them out on your tree and move them into a position you are happy with. Then you pick a random random circle and write 1 on it. Flip it over and on the other side write a fun Christmassy thing to do, like make a card, bake honey biscuits, or a cool DIY project.

7. Repeat numbering and writing on all of the circles, and remember you can have them all spread out randomly!

8. Use some extra washi tape to stick the circles onto the tree. 

And you're done!


(Sorry it's upside down, but it does give you a clue of what's to come on Christmas DIY!)

This is such an inexpensive and easy way to skip the chocolate and make the lead up to Christmas fun! You could even hang tinsel or fairy lights around it!

Au Revoir!!

Tuesday, December 03, 2013

December News!!

Hello Everyone!

Throughout December, I have SO much planned for you guys! There's lots of different blog posts I am going to make, including a mini series that is going to be called Christmas DIY!


In this series I will be making a blog post every few days as a lead-up to Christmas about something fun and festive that you can make. It could be a craft project, a snack, or some other Christmas related posts like present wrapping or present ideas to get you in the mood for Christmas! I guess it will be kind of like not-quite-daily Advent Calendar posts?

I understand that this is probably not the wisest thing to do, because you won't have time to try some of the DIY things as it gets nearer to Christmas day, so I'll do most of the DIY posts sooner and more general Christmas stuff later on in the month.

I'm also going to continue my Scrumptious Saturday's posts, and maybe do some reviews and what-I-did-today type posts chucked in there too!

So that's a quick overview of the stuff I will be posting about this month, if you have any post suggestions feel free to leave them in the comment section below! I really hope you enjoy the coming Christmas DIY series and other Christmas related posts I will be making!

Au Revoir xx

Sunday, December 01, 2013

Best of November


Hello!
As you know, it is now December! Yay! The month of celebrating and festivities and fun, but it also means that another amazing month has passed. November has been very busy and long, but a lot of good stuff has happened!

Highlights of November

The start of this blog - Yep, I've only been blogging for one month, but now it is part of me and I am so glad I made my blog. There's a lot more good stuff coming, and a lot of Christmas themed posts, and I am so exited for that!

YouTube - I've started watching youtube videos a lot more commonly this month and now rarely a day passed without watching a few. I watch lots of makeup, beaty, and DIY videos. These are some of my favourite channels:

Zoella
Bethany Mota
Sprinkleofglitter
JacksGap
Tanya Burr
Troye Sivan

Getting Confirmed - I got confirmed as a Christian early this month and with that came a beautiful Pandora bracelet, and Pandora earings!

Charity Netball Match - I saw a game of netball between the Adelaide Thunderbirds and a Mix 102.1 team and other random people. This was hilarious as no one was playing by the rules and it was all very care-free and funny. And it was only $5 for the ticket!

Those are a few of the most memorable things that have happened this month, but it is all the small things that have occurred that made November amazing. Some of these were nearing the end of school for the year, a friends super fun birthday party, a big day of Christmas DIY crafts, creating a gallery wall of artworks in my room, having a huge shopping spree, and seeing Catching Fire in the cinemas have been some of them.

Favourites of November
I have also been enjoying using many different products and items in November.

The Body Shop Strawberry Body Lotion, Strawberry Body Wash, and Strawberry Body Butter - I got these as a gift set on my birthday, and I just love them. I also have the Shea Body Butter and I love that too. These are so nice and refreshing to use after a bath or shower, and the fruity fragrance is to die for! They leave my skin silky, soft, and yummy-smelling!

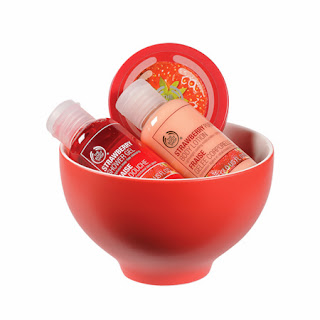
The set that I got for my b-day <3
Sukin Foaming Facial Cleanser and Sukin Sensitive Facial Moisturiser - These products are super light and fresh, and they both smell beautiful. I use the cleanser every night and the moisturiser every morning and night. The cleanser just smells really nice and fresh and green (can something smell green?), and the moisturiser smells so lovely and floral-y. This has to be my favourite skin care brand ever.


Lauren Conrad: Beauty - This is a great book for beauty lovers and I like how it talks about self-esteem issues and all parts of beauty, like fitness and hair, not just makeup.


Mother Earth Oaty Slices - These are super yummy and relatively healthy, a perfect snack for during or after school. They come in a few different varieties, my favourite is White Choc and Raspberry!

So those were some of my favourites and highlights, making up my Best of November! I hope you enjoyed it! What did you do last month?

Au Revoir xx

DESIGN BY SWEET ELECTRIC